Ten years ago, when I bought a 45-foot aluminium centreboard cruiser, I hadn’t heard the word electrolysis since secondary school and Mrs Duret’s more or less successful — mostly less — experiments. I can still picture myself hanging sacrificial anodes from the boat’s lifelines. Lifelines sheathed in plastic.
In ten years, I have picked up a little experience…
- I have known the panic of the leak tester suddenly going all red when nothing in particular had happened, and the afternoons spent disconnecting cables more or less at random while my friends were at the beach or having a drink.
- I have solved my share of sneaky leaks (did you know that the DC- of a Cerbo GX runs through the RJ45 cable that connects it to the MultiPlus?).
- Watched workmen drill into the ceiling to fit panels and land squarely on an electrical wire (twice!).
- Been treated to intermittent leaks (like the aft-cabin spotlight that is never switched on when you test).
- And a thousand other adventures, each of which contributed to my premature ageing.
This article contains all of that accumulated experience, in condensed form, for the reader in a hurry.
TL;DR:
- Buy an isolation transformer (and stop worrying about your shore power).
- Fit anodes against your hull (and your propeller), and validate the installation (0 ohms between the anode and the hull).
- Buy a reference electrode to validate your anode installation (between -0.85 V and -1.10 V between the hull and the reference electrode).
- Buy a HullSentry (and stop worrying about electrical leaks on your 12/24/48 V installation).
Two very different phenomena
Stray-current (electrolytic) corrosion and galvanic corrosion are two very different phenomena.
Galvanic corrosion happens naturally whenever two different metals (say, aluminium and bronze) sit in a conductive solution (for instance: seawater, which can be outside the boat, or in the bilge). A current flows, and the less noble metal (here, unfortunately, the aluminium) falls apart.
Three broad strategies to avoid it:
- Use sacrificial anodes (meaning: even less noble than aluminium). Typically zinc in seawater, and magnesium in fresh water. They “sacrifice” themselves: it is normal for them to waste away (the opposite is not — it can mean they are badly installed, for example with a layer of epoxy insulating them from the hull).
- Avoid accelerating the phenomenon by giving the current an easy return loop. For example: bronze propeller -> prop shaft -> engine on the negative bus -> battery negative -> hull. That kind of arrangement really has no place on an aluminium sailboat, and plastic coupling discs exist precisely to break the circuit.
- Impose a current in the opposite direction to protect the aluminium… That one is an aircraft-carrier trick: it exists, but it is far too complicated for a small sailboat.
When those two basic precautions are taken (no electrical continuity between dissimilar metals, sacrificial anodes properly installed), the phenomenon is slow, predictable, and nothing to worry about.
Careful, though: too many anodes is also a problem. Aluminium dissolves in alkaline environments just as it does in acidic ones. Overenthusiastic protection (too many anodes, or magnesium in seawater) raises the pH against the hull and dissolves the alumina layer: that is alkaline attack. Symptoms: paint blistering around the anodes, white powdery deposits. On the reference electrode, the healthy range runs from about -0.85 to -1.10 V; below that, you are overprotected — and it is almost as dangerous!
Stray-current corrosion can move very fast
Stray-current corrosion, on the other hand, appears when an electrical current flows through the hull. If you only have a leak on the negative side (or the positive side) — for example a badly insulated cable lying in bilge water — nothing happens. But if a similar leak then appears on a positive cable, the circuit closes and the hull can get damaged extremely fast.
Chemically speaking, 1 mA flowing continuously for a year = 2.94 grams of aluminium, or 1.11 cm³. Enough to make a nice hole in the hull, because the phenomenon unfortunately tends to concentrate in a single spot rather than spread evenly over the whole hull. By default, aluminium is protected: by a layer of epoxy if painted, and by a layer of alumina if bare. But the slightest scratch or defect will start the process: the confined water acidifies and loads up with chlorides, which prevents the aluminium’s protective oxide layer from re-forming. The active pit becomes the current’s favourite path, and it digs. Concentrated on 1 cm², our milliamp from a moment ago works out to 11 mm per year — the thickness of a hull plate.
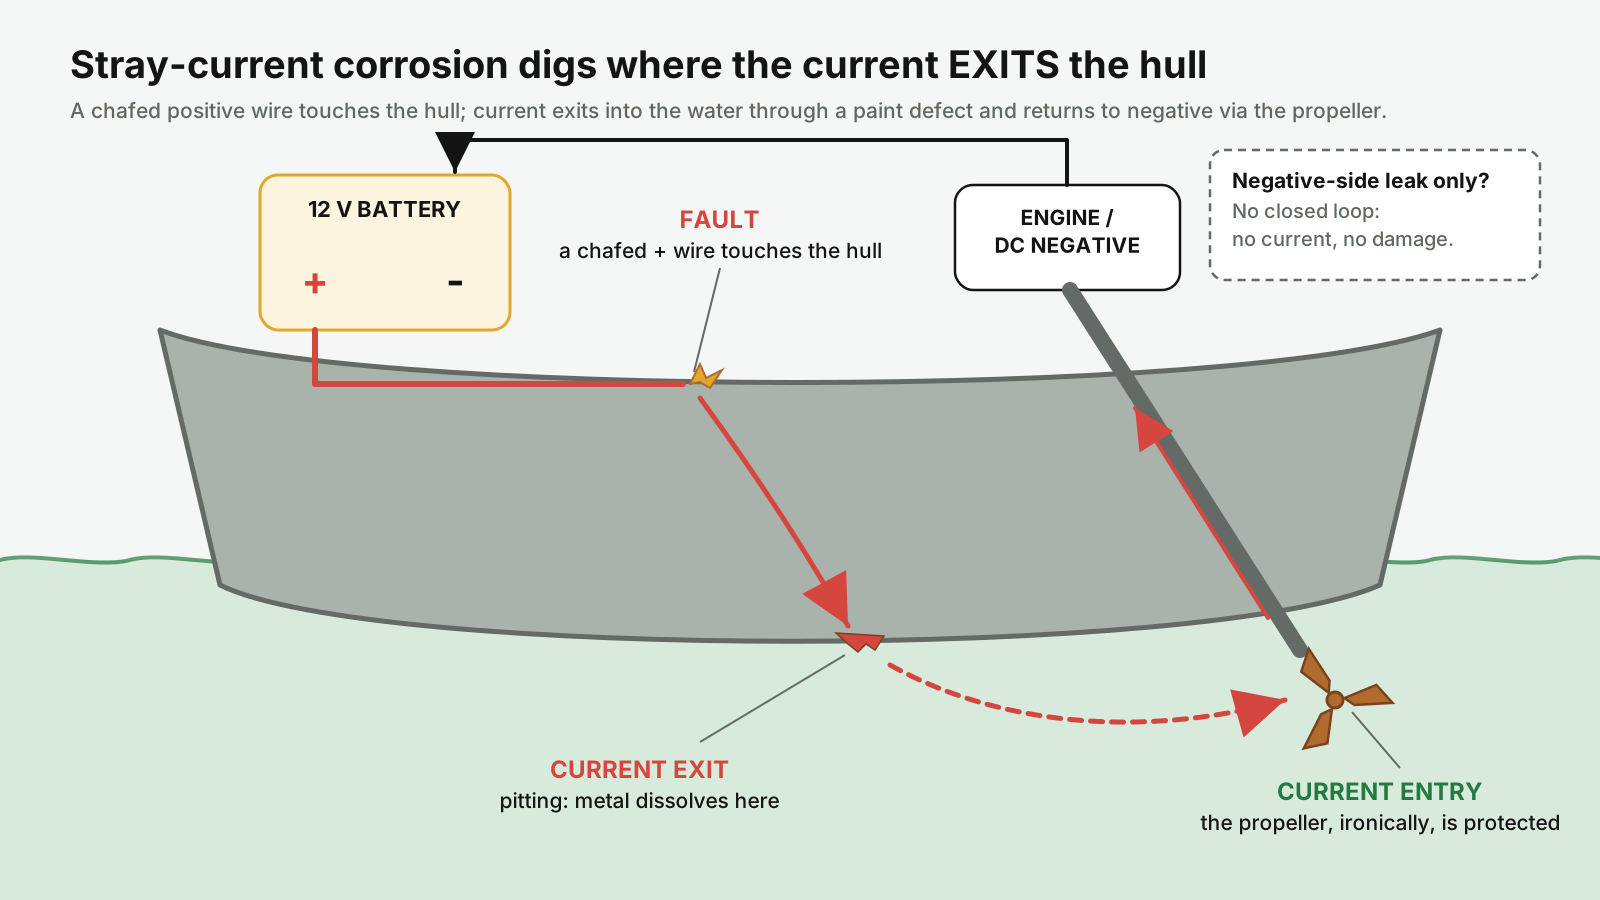
Metal is lost where the current exits the hull: that is where it digs. The propeller, where the current enters, is actually protected. And a leak on one side only drives no current at all — until the day a second leak closes the loop.
Protecting yourself
First, with a squeaky-clean electrical system:
- double-pole breakers ahead of every circuit;
- separate negative returns for each consumer;
- properly insulated cables, especially where a junction has to be made down in the bilges (for a bilge pump, say);
- double-pole battery switches, with a clear diagram of the consumers that stay permanently powered;
- and in general, an up-to-date wiring diagram and labelled cables.
Then, avoid at all costs mixing bronze (or copper, or stainless steel) with aluminium:
- isolate the prop shaft from the engine with a plastic coupling;
- avoid bronze through-hulls;
- avoid “classic” copper-based antifouling;
- use Tef-Gel everywhere stainless is screwed into the hull, and nylon washers and backing plates between stainless washers and the hull.
Then, use a reference electrode. It is genuinely useful for checking that the anodes are doing their job, but the reading is local, so getting a complete picture is fairly tedious. And if you run your tests at noon while the leak only appears at night (say), you risk feeling falsely safe.
Finally, use a leak tester very regularly — which has its own limits:
- you do not see intermittent faults;
- you do not see trends while they are still “under the radar”;
- when a fault is flagged, the time window to investigate is enormous (everything since the last test).
The last option is HullSentry. It is an automated leak tester that answers those three limitations by automatically testing all your batteries every ten minutes, without interruption. It turns a panic of the “how long has this been going on, has it done any damage, and what happened?” kind into a non-event of the “what did I do in the last ten minutes? Oh right, I just changed a bulb” kind.
Watch out for dockside shore power
In a marina you inevitably plug into shore power, and if your installation is compliant, the shore earth is connected to your hull. The trouble is that in doing so, all the hulls end up connected together. The plastic boats probably have their engine on the negative bus and an un-isolated prop shaft, and in short you end up with a giant battery made of every propeller in the harbour, and… one aluminium hull. Very bad scenario.
A bronze-aluminium galvanic circuit has a total potential of a few hundred millivolts (typically 0.2 to 0.5 V), so thanks to a clever arrangement of diodes you can block the current as long as the voltage stays low (typically below 1.4 V) while letting higher voltages through, to protect people and keep the residual-current breaker working. That comes as a small box called a galvanic isolator, and it really is the bare minimum when you own an aluminium boat.
The trouble is that if one of those boats has an electrical leak on its positive side, this time it is not 100 mV but 14 or even 28 volts feeding the circuit — and that is a catastrophe. To be genuinely serene, the only solution is an isolation transformer: roughly, the shore’s 220 V feeds a coil that creates an alternating magnetic field; a second coil, with no wire in common with the first, picks up that field and manufactures fresh 230 V. You thereby recreate an earth that has nothing to do with the shore’s, while keeping the onboard 230 V installation safe. It is not free, but given the stakes it feels indispensable.
An ohmmeter is not the right tool for finding the leak
It is very tempting to use an ohmmeter in “continuity” mode to hunt for a leak: black probe on the battery negative, red probe on the hull, disconnect all the cables, reconnect them one by one, and if it beeps, there is your leak. The big problem with that approach is that it does not work: an ohmmeter only works on a perfectly dead circuit. As soon as any current flows, the numbers stop meaning anything at all. The other problem is that the beep only sounds for a very, very low resistance. It stays silent for leaks that are nonetheless dangerous — 10 kΩ, for example.
If you are not equipped with a leak tester, the right tool is the voltmeter, NOT the ohmmeter. Unlike the latter, a voltage measurement can perfectly well be taken on a live circuit. Measure the voltage between hull and + terminal, then hull and - terminal, and see which way the leak tilts (that is, on which side the voltage is close to zero). Then disconnect half the circuits and watch what moved, and so on. Working by dichotomy like this, you can find the leak fairly quickly — provided it hides behind a breaker.
Conclusion
Ten years on, I do not claim to have seen it all — an aluminium boat unfortunately has plenty of imagination. But the essentials, which will leave you better armed than 99% of owners, fit in the TL;DR at the top: an isolation transformer so you can stay serene in the marina when a sailor tells the story of the brand-new aluminium boat that sank in one week flat at the very berth J45 you have just moved into; anodes verified with the electrode to keep galvanic corrosion in check; and very regular testing (manually with a standard tester, or automatically with HullSentry) to catch DC leaks while they are still micro-leaks, on one side only (that is, not yet dangerous).